Creative Cereal Box Crafts for Kids

Cereal Box Crafts
I am almost positive that every household has at least one cereal box in their home. Even if you usually recycle your cereal boxes, there are some other great uses for these cardboard boxes even before you send that to that recycling bin. With a little creativity and a few extra supplies, you can turn a boring afternoon into some crafting fun!


Magazine or Book Holder
This craft is perfect for organizing your books or magazines in your home or classroom. In my fourth grade class, we had purchased organizers for our students to keep their reader's workshop materials in. I wish I had thought of this craft before we bought them. This is not only a great way to personalize their book bins, but it is also a great way to reuse materials. If you have an overload of magazines in your house, this would be a great way for you to keep them displayed neatly and organized.
Materials Needed:
- Cereal box
- Mod Podge or liquid glue
- Foam brush
- Decorative paper
- Scissors
- Any additional embellishments such as stickers, glitter, etc.
To create your book or magazine organizer, cut the flaps off of the top of the box. Then on one side of the box, cut the side out about 2/3 of the way down. Then, using the Mod Podge, brush one side of the box and the cover it with decorative paper of your choice. Continue this with each side of the box. You can use one paper style or create a collage of colors and designs. Once all of the box is covered, you can add additional decorations to personalize the holder.
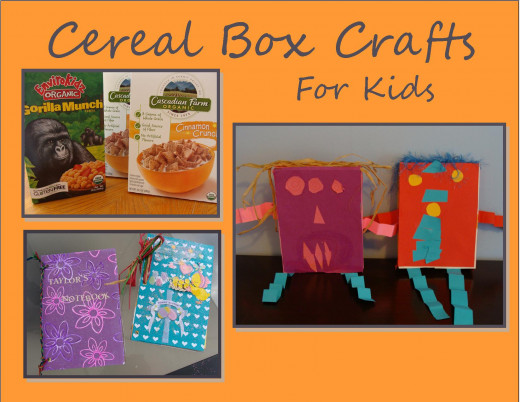
Picture Guide to Making a Cereal Box Notebook
Click thumbnail to view full-size


Notebook or Mini Scrapbook
To make this craft, you will need to cut the cereal box apart and create a front a back cover. This can be as small or as large as you wish. You could even cut it into a unique shape such as a heart or a circle.
Materials Needed:
- Front and back of the cereal box
- Mod Podge or liquid glue
- Foam brushes
- Blank or lined paper for inside
- Scissors
- Decorative paper
- Additional embellishments
- Hole Puncher
- Ribbon or yarn of some sort
Cut the cereal box to the size that you wish. Be sure that you have a front and back that line up. Then cut your paper so that it is just about a 1/2 inch smaller than the front and back of the notebook. Spread the Mod Podge on one side of the cereal box and then place it one the decorative paper. When it is secure, cut the paper to meet the sides of the cardboard. Repeat for the other side. Line up the paper inside the front and back covers of the notebook. You can bind them together by hole punching the sides and tying a decorative ribbon. Your kids will fill these up and beg you to make more!


Bookmarks
There is no need to waste a single bit of a cereal box. If you are making a notebook, you can save the smaller sides and create unique and personalized bookmarks with them. They are the perfect width and you can cut them down to the length that you desire.
Decorations can be as simple or as complex as you wish. Anything from stickers to glitter to drawings are a perfect way to personalize your bookmarks. If you are using this in a classroom for your students, you can even have students glue a list of reminders about reading on their book marks. These are a very easy and versatile craft.
Pictures for Making Cereal Box Monsters
Click thumbnail to view full-size


Cereal Box Crafts
Which craft do you think you will make with your children?
Cereal Box Monster
These cereal box monsters thrilled my kids! They had so much fun turning old boxes into scary creatures with crazy faces and hair. You can use this idea to make aliens, or robots or any other creature that you can think of.
Materials Need:
- cereal box
- liquid glue or Mod Podge
- construction or other decorative paper
- scissors
- yarn
- markers
- buttons
- any other additional decorative embellishments
There are not too many formal steps in this craft. Simply use the liquid glue or Mod Podge to cover the sides of the box and then place the paper over the glue. Children can use one color or vary the colors for each side. Then allow kids to create faces with different materials like buttons, construction paper shapes, pieces of aluminum foil, etc. We used Raffia ribbon and other yarn to create the hair on top of the monsters' heads. Then we created an accordion construction paper pieces to make arms and legs. You could even add shoes or hands if you want! The only thing that will limit your monsters is the imagination of your own little monsters!


